Schedule Recurring Virtual Office Hours in Teams
Overview
Microsoft Teams is Trocaire’s designated web conferencing platform. Faculty who are conducting virtual office hours are expected to use Teams Meetings to connect with their students. There are three ways to schedule a Teams Meeting:
- Through the Outlook desktop app on a Trocaire-owned computer
- Through Outlook on the Web (browser)
- Through Microsoft Teams calendar
Outlook App (Trocaire-Owned Device)
I – Create Recurring Meeting
- Using a Trocaire-owned computer, open the Outlook desktop app
- Navigate to your Outlook calendar
- Select New Teams Meeting from the toolbar. A new window will appear with a Teams link automatically generated
- In the To… field, invite yourself to the meeting by manually typing your Trocaire email address
- In the Subject field, enter a name for this calendar event (Example: BIO130 Virtual Office Hours)
- Select Recurrence
- Select the settings as applicable:
- Choose the start time
- Choose the end time
- Select Weekly
- Select the day of the week you want this calendar event to repeat
- Select the Start date (first day you will offer office hours)
- Select the applicable end date (i.e. the last time this calendar invite will appear on your calendar)
- Select OK
- Select Send to save the event on your Outlook calendar
II – Enable the Lobby (Optional)
Enabling the lobby in your Teams Meeting means that when a user selects the Teams link, they are automatically put in a virtual lobby rather than being admitted directly into the meeting. This option is great for faculty who are hosting virtual office hours using Teams; the instructor can add students into the meeting from the lobby once they are finished talking to the previous student.
- Select Meeting Options
- Under “Who can bypass the lobby?” select the dropdown menu and choose Only me
- Select any other applicable options as desired
- Select Save when finished
If you enable the lobby, you may want to consider including the following language in your communication to students related to your virtual office hours (feel free to copy and edit as needed):
To join my virtual office hours, select the meeting link. Note that you will be put into the lobby, which is a virtual waiting room. I will add you to the meeting once I am available; note that wait times will vary as I will meet with students on a first-come, first-serve basis.
III – Retrieve Meeting Link
- Double click the calendar event
- Select The entire series
- Select OK
- Right click the words “Click here to join the meeting”
- Select Copy Hyperlink
- Paste the link where applicable (Syllabus, Moodle course, email, etc.)
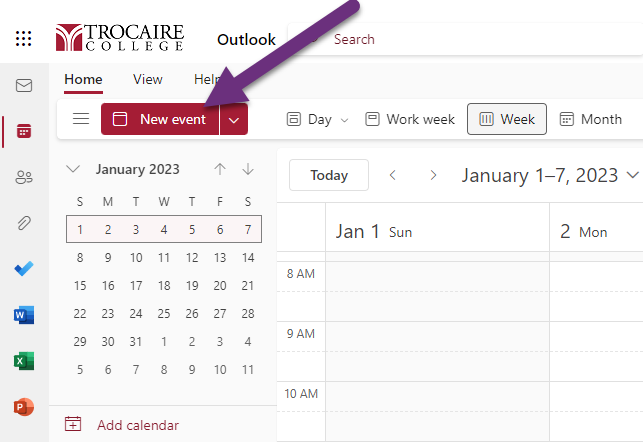
Outlook on the web
I – Create Recurring Meeting
- Open a browser (Google chrome recommended)
- Go to portal.office.com (opens in new window)
- If not already signed in, sign in with your Microsoft 365 credentials
- Username: Trocaire email address
- Password: Your Microsoft 365 password. If you forgot your password, learn how to reset it.
- Select Outlook from the navigation menu on the left
- Select the calendar icon from the navigation menu on the left to access your Outlook calendar
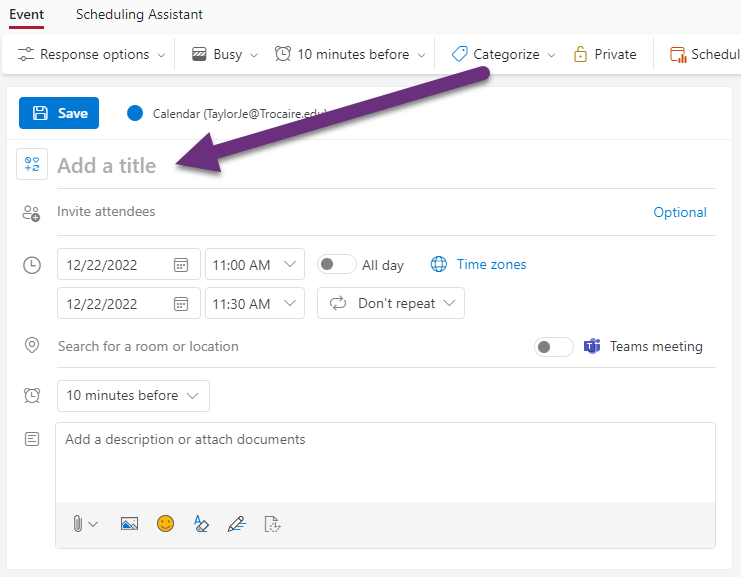
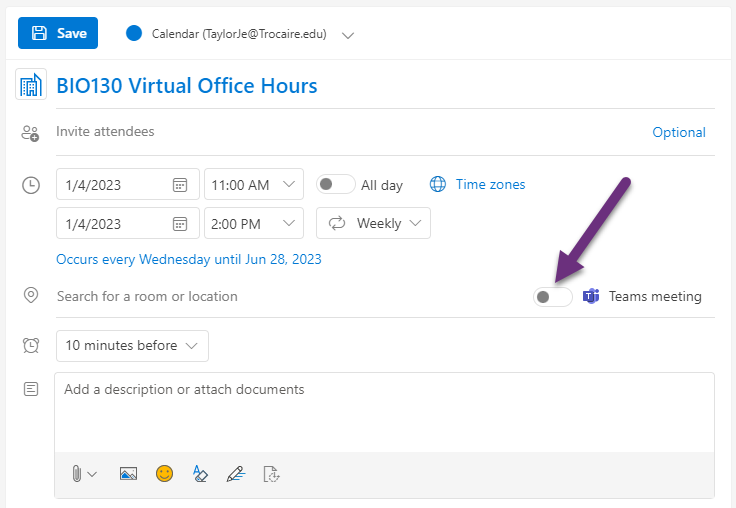
- Select New event
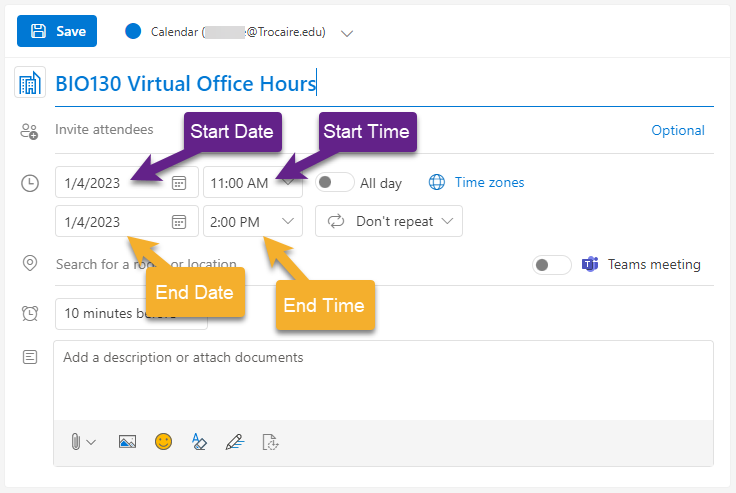
- In the Add a title field, enter a name for this calendar event (Example: BIO130 Virtual Office Hours)
- You do not need to enter an attendee
- Select the Start date (first day you will offer office hours)
- Select the Start time (e.g. if your office hours are from 11:00 AM to 2:00 PM every Wednesday, select 11:00 AM)
- The End date should be the same as the Start date
- Select the End time (e.g. if your office hours are from 11:00 AM to 2:00 PM every Wednesday, select 2:00PM)
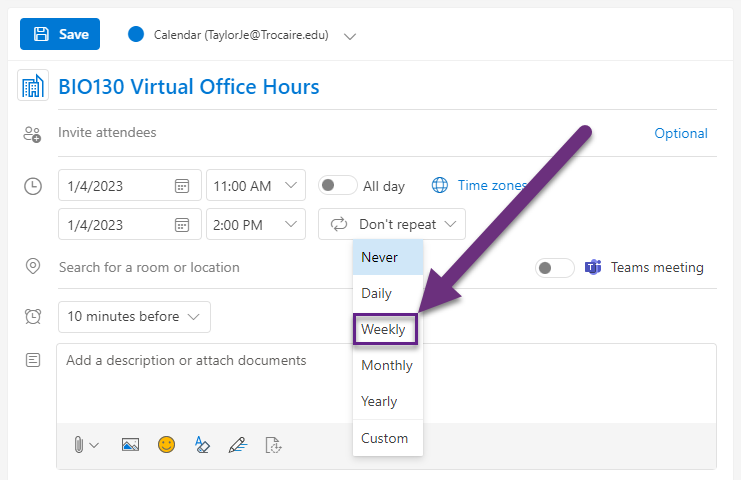
- Select the “Don’t repeat” dropdown menu and choose Weekly
- A new box will appear. By default, “Repeat every 1 week” is selected. If you’re offering office hours on the same day/same time each week, you can leave this setting or adjust if necessary
- By default, the day of the week that the first day of the event occurs will automatically be selected. You can change this if necessary.
- Select end date or remove end date (i.e. calendar event repeats indefinitely)
- Select Save when finished
- Select the toggle next to “Teams meeting”
- Select Save
II – Enable the Lobby (Optional)
Enabling the lobby in your Teams Meeting means that when a user selects the Teams link, they are automatically put in a virtual lobby rather than being admitted directly into the meeting. This option is great for faculty who are hosting virtual office hours using Teams; the instructor can add students into the meeting from the lobby once they are finished talking to the previous student.
- Double click the calendar event
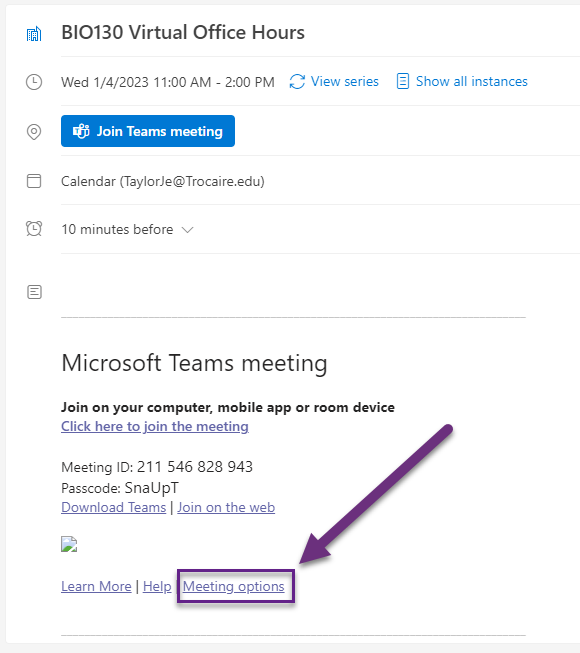
- Under the “Microsoft Teams Meeting” heading, select Meeting options. This will open a new tab in your browser.
- Next to “Who can bypass the lobby?” select the dropdown menu and choose Only me
- Select any other applicable options as desired
- Select Save when finished
If you enable the lobby, you may want to consider including the following language in your communication to students related to your virtual office hours (feel free to copy and edit as needed):
To join my virtual office hours, select the meeting link. Note that you will be put into the lobby, which is a virtual waiting room. I will add you to the meeting once I am available; note that wait times will vary as I will meet with students on a first-come, first-serve basis.
III – Retrieve Meeting Link
- Select the calendar event
- Select Edit
- Select This event
- Select More options
- Right click the words “Click here to join the meeting“
- Select Copy Hyperlink
- Paste the link where applicable (Syllabus, Moodle course, email, etc.)
Microsoft Teams Calendar
Part I – Create Recurring Meeting
- Navigate to Microsoft Teams
- Open the Microsoft Teams app on your computer download the Microsoft Teams app (opens in new window)
- Access Microsoft Teams from your browser (opens in new window
- If not already signed in, sign in with your Microsoft 365 credentials
- Username: Trocaire email address
- Password: Your Microsoft 365 password.
- Select the Calendar icon from the navigation menu on the left
- Select + New Meeting
- In the Add title field, enter a name for this calendar event
- In the Add required attendees field, invite yourself to the meeting by manually typing your Trocaire email address
- Select the Does not repeat download menu
- Select Weekly
- Select the Start date (first day that you will offer office hours)
- Select the day of the week you want this calendar event to repeat
- Select the applicable end date (i.e. the last time this calendar invite will appear on your calendar)
- Select Save
- Select Send to save the calendar event
Part II – Enable the Lobby (Optional)
Enabling the lobby in your Teams Meeting means that when a user selects the Teams link, they are automatically put in a virtual lobby rather than being admitted directly into the meeting. This option is great for faculty who are hosting virtual office hours using Teams; the instructor can add students into the meeting from the lobby once they are finished talking to the previous student.
- Select the event
- Select Edit
- Select Edit series
- Right click Meeting options
- Select Open Link
- Under “Who can bypass the lobby?” select the dropdown menu and choose Only me
- Select any other applicable options as desired
- Select Save when finished
If you enable the lobby, you may want to consider including the following language in your communication to students related to your virtual office hours (feel free to copy and edit as needed):
To join my virtual office hours, select the meeting link. Note that you will be put into the lobby, which is a virtual waiting room. I will add you to the meeting once I am available; note that wait times will vary as I will meet with students on a first-come, first-serve basis.
Part III – Retrieve Meeting Link
- Select the even on your Microsoft Teams calendar
- Hover over the URL link and select the copy button
- Paste the link where applicable (Syllabus, Moodle course, email, etc.)